
Microsoft Outlook saves a copy of all the emails you send using the application. This allows you to view your sent emails later on when you want. However, if you don’t want this to happen, and you’d rather keep your Sent Items folder empty, you can actually prevent Outlook from saving a copy of your sent emails.
There are a couple of ways to do this in Outlook, and this guide describes some of those methods.
Why Not Save Your Sent Emails?
Honestly, there aren’t many reasons you would not want to save your sent emails. However, that’s not to say there are no reasons at all.
One reason you might want to do this is if you’re concerned with privacy. It will ensure no one can see your sent emails through Microsoft Outlook.
Another possible reason could be that your computer is running out of space. If you don’t save your sent emails, especially the ones with large attachments, you can free up some space on your storage drive.
How to Prevent Outlook From Saving a Particular Email in Sent Items
You can prevent sent emails from storing in your inbox per-email. This way, you can choose the emails that you want to use this feature on. Here’s how to stop Outlook from saving your specific sent emails:
- Open Outlook and start writing a new email. This is the email that won’t save itself in Sent Items.
- While on the email compose window, click Options at the top.
- Click the Save Sent Items To menu in the More Options section.
- Choose Do Not Save from the available options.

Outlook won’t save a copy of this email in Sent Items.
How to Prevent Outlook From Saving All Your Sent Emails
If you don’t want to save any of your outgoing emails, you can get Outlook to stop storing them in sent items. There are two ways to do this as outlined below.
Using the Microsoft Outlook App
The easiest way to stop storing all your sent emails is to use the Outlook settings menu. You just need to untick an option, and you’re all set. Here’s how you do that:
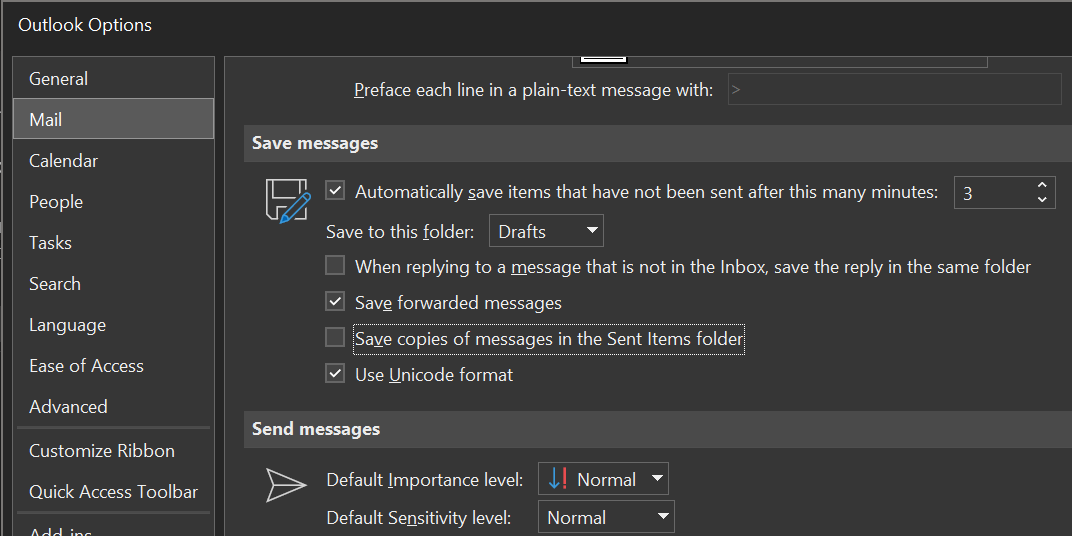
- Launch Outlook on your computer.
- Click File in the top-left and then click Options in the left sidebar.
- Select the Mail menu from the left column.
- Scroll down the right pane until you see the Save messages section.
- Here, you’ll find an option that says Save copies of messages in the Sent Items folder. Untick this option.
- Click OK at the bottom.
From now on, Outlook won’t keep a copy of any of your sent emails. If you ever need to re-enable the feature, simply tick the option again following the same procedure.
Using Windows Registry
You can use the Windows Registry to prevent Outlook from storing your sent emails. You can do this by adding a new value to the registry.
Back up your Windows registry if you’re not too confident, and then you can follow these steps without any worries:
- Open Outlook and click File in the top-left corner.
- Select Office Account from the left sidebar.
- Click About Outlook on the right pane.
- Note the version of your Outlook app. This appears in brackets at the very top of your screen.
- Open the Registry Editor by pressing Windows + R keys, typing regedit, and hitting Enter.
- Click Yes in the prompt.
- Navigate to the following directory in the registry. This path opens the registry values for Outlook 16, and so make sure you choose your own version in the path below.
HKEY_CURRENT_USERSoftwareMicrosoftOffice.0OutlookPreferences - Once you’re there, right-click somewhere blank on the right pane and select New > DWORD (32-bit) Value.
- Enter SaveSent as the name of the DWORD and press Enter.
- Double-click the newly created DWORD file.
- Enter 0 in the Value data field and click OK.
- Close the registry.

If you ever need to enable Outlook to start saving your sent emails, simply change the value of the SaveSent DWORD to 1 and that should do it for you.
How to Save Your Sent Emails in a Different Folder
Sent Items isn’t the only folder where you can save your sent emails. If you’d rather prefer some other folder to store your sent messages, you can configure that option in your Outlook.
This requires you to create a rule in Outlook that sends all your sent emails to your specified folder. Here’s how to create this rule in Outlook:
- Open Outlook and click File in the top-left.
- Select the Manage Rules & Alerts option on the right.
- Click New Rule under the Email Rules tab.
- Select Apply rule on messages I sent and click Next.
- Outlook will ask what condition you’d like to apply to your rule. Click Next without selecting anything to apply the rule to all your sent emails.
- Hit Yes in the prompt.
- Tick move a copy to the specified folder.
- Click the specified blue link in the bottom box.
- Select the folder where you want to save your sent emails, and click OK.
- Click Next.
- Enter a name for your new rule and click Finish to finish setting up the rule.

Your future sent emails will now be located in your specified folder instead of Outlook’s default Sent Items folder.
If you ever want to disable this new behavior, head into the rules menu in Outlook and uncheck the newly created rule. That will disable the rule and the actions that it performs.
Don’t Let Anyone See the Emails You Send
If you prefer your emails to be extremely confidential, avoid storing your emails in the Sent Items folder. The methods above help you do just that so nobody knows what emails you send and to whom.
Moreover, if you prefer not to have a copy of your emails in Microsoft Outlook, you can archive your emails instead. However, keep in mind this keeps your emails searchable, and it may not be an ideal solution if you’re looking to hide your emails.


